

Send a payment from a server
Send a BitcoinSV (BSV) payment from a Node.js script that holds its own wallet, so a backend, a scheduled job or an agent can pay with no person approving each payment. The server wallet keeps its keys in a .env file and its coins in a local SQLite file, and BSV Desktop funds it once on testnet. Use it when your code runs where no one can click Authorize, and follow Send a payment from a web app instead when a person pays from an app. The example runs on its own in an empty folder and ends with 1,000 testnet satoshis sent from the server to your BSV Desktop wallet, with the transaction ID on the explorer.
Before you begin
- Node.js 22 or newer, which
@bsv/sdkand@bsv/wallet-toolboxrequire. This page was tested on Node.js 24. - BSV Desktop on testnet with free testnet coins. If you do not have it yet, follow Set up a testnet wallet and Get free testnet coins in the web app guide.
How it works
The page uses two wallets, each with its own job:
- The server wallet, created with
Setup.createWalletSQLitefrom@bsv/wallet-toolbox, holds its keys in.env, tracks its coins inwallet.sqlitein the project folder and signs its own payments. - BSV Desktop is your own wallet. It funds the server wallet once, with your approval, and receives the payment the server sends.
Four scripts do the work, and each opens the server wallet through a small shared module, server-wallet.mjs. The script create-env.mjs generates the keys, balance.mjs checks the network and the balance, fund.mjs asks BSV Desktop to pay the server wallet, and pay.mjs sends the payment to your BSV Desktop address.
Create the server wallet
The first step is to create a project folder with the server wallet and its keys:
Install the packages
Create an empty folder, open it in the terminal and install @bsv/sdk and @bsv/wallet-toolbox:
npm init -y
npm install @bsv/sdk @bsv/wallet-toolboxThe toolbox installs SQLite with it, so the wallet needs no database server. This page was written against @bsv/sdk 3.2.1 and @bsv/wallet-toolbox 2.14.9.
Keep the keys out of git
Create .gitignore in the project folder, so the keys and the wallet file never reach a repository:
.env
wallet.sqlite
node_modules/Generate the keys
The .env file holds the private keys of the server wallet. Keep it private, never print it, paste it into code or commit it, and never share it. Anyone with this file can spend the coins of the server wallet.
Write the keys of the server wallet to .env with Setup.makeEnv(). Save this script as create-env.mjs in the same folder:
import { existsSync, writeFileSync } from 'node:fs'
import { Setup } from '@bsv/wallet-toolbox'

if (existsSync('.env')) {
  console.log('.env already exists, nothing was written.')
} else {
  writeFileSync('.env', Setup.makeEnv(), { mode: 0o600 })
  console.log('Wrote the server wallet keys to .env.')
}The script never prints the keys. It checks first that .env does not exist, so running it again does not replace the keys of a wallet that already has coins.
Run it once:
node create-env.mjsWrote the server wallet keys to .env.Open the wallet
Add a small module that the other scripts use to open the server wallet. Save it as server-wallet.mjs:
import { Setup } from '@bsv/wallet-toolbox'

process.loadEnvFile('.env')
export const env = Setup.getEnv('test')

export function openWallet () {
  return Setup.createWalletSQLite({ env, filePath: './wallet.sqlite', databaseName: 'server-wallet' })
}Setup.getEnv('test')reads the keys from.envand sets the chain to testnet.testis the name the toolbox uses for testnet.Setup.createWalletSQLiteopens the wallet and createswallet.sqliteon the first run. The file keeps track of the coins the wallet can spend.
Check the network and the balance
Create balance.mjs, which opens the wallet and prints its network and balance:
import { openWallet } from './server-wallet.mjs'

const setup = await openWallet()
const { network } = await setup.wallet.getNetwork({})
console.log(`Network: ${network}`)
console.log(`Balance: ${await setup.wallet.balance()} satoshis`)
await setup.wallet.destroy()Run it:
node balance.mjsNetwork: testnet
Balance: 0 satoshisThe new wallet is on testnet and empty. A satoshi is the smallest unit of BSV, and 100,000,000 satoshis make 1 BSV. destroy() closes the database file when the script ends.
Fund the server wallet from BSV Desktop
With the server wallet ready, the next step is to move testnet coins into it from BSV Desktop, the only step where you approve a payment:
Write the funding script
Create fund.mjs, which asks BSV Desktop to pay 1,500 satoshis to the server wallet and then hands the payment to the server wallet:
import { WalletClient, P2PKH, PublicKey, Random, Utils } from '@bsv/sdk'
import { env, openWallet } from './server-wallet.mjs'

const amount = 1500
const desktop = new WalletClient('auto', 'example.com')
const { network } = await desktop.getNetwork({})
if (network !== 'testnet') throw new Error(`BSV Desktop is on ${network}. Switch it to testnet.`)

const derivationPrefix = Utils.toBase64(Utils.toArray('payment', 'utf8'))
const derivationSuffix = Utils.toBase64(Random(8))
const { publicKey: senderIdentityKey } = await desktop.getPublicKey({ identityKey: true })
const { publicKey: paymentKey } = await desktop.getPublicKey({
  protocolID: [2, '3241645161d8'],
  keyID: `${derivationPrefix} ${derivationSuffix}`,
  counterparty: env.identityKey,
  forSelf: false
})

console.log('Approve the Spending Request in BSV Desktop...')
const { tx } = await desktop.createAction({
  description: `Fund server wallet (${amount} sats)`,
  outputs: [{
    lockingScript: new P2PKH().lock(PublicKey.fromString(paymentKey).toAddress()).toHex(),
    satoshis: amount,
    outputDescription: 'Server wallet funding'
  }],
  options: { randomizeOutputs: false, acceptDelayedBroadcast: false }
})

const setup = await openWallet()
await setup.wallet.internalizeAction({
  tx,
  outputs: [{
    outputIndex: 0,
    protocol: 'wallet payment',
    paymentRemittance: { senderIdentityKey, derivationPrefix, derivationSuffix }
  }],
  description: 'Funding from BSV Desktop'
})
console.log(`Server wallet balance: ${await setup.wallet.balance()} satoshis`)
await setup.wallet.destroy()WalletClientconnects to BSV Desktop, as in the web app guide. The script stops unless BSV Desktop is on testnet.- The payment goes to a key that only the server wallet can spend. BSV Desktop works it out from the server’s identity key (
env.identityKey) and a randomderivationPrefixandderivationSuffix, with thewallet paymentprotocol of BRC-29BSV Request for Comments 29: the payment key derivation protocol, whose ID is[2, '3241645161d8']. createActionreturns the transaction astx, ready for the server wallet.acceptDelayedBroadcast: falsemakes BSV Desktop broadcast it before it returns.internalizeActiongives the payment to the server wallet, with the same prefix, suffix and sender, so the server wallet can find the key and spend the coins later.
Run it and approve the payment
Keep BSV Desktop open and run the script:
node fund.mjsBSV Desktop opens a Spending Request from example.com for “Fund server wallet (1500 sats)”, with the total including the fee. The fee depends on the size of the transaction, so the total changes from one payment to the next, for example 1,594 or 1,668 satoshis. A sent payment cannot be undone, so check the app name and the amount, then click Authorize:
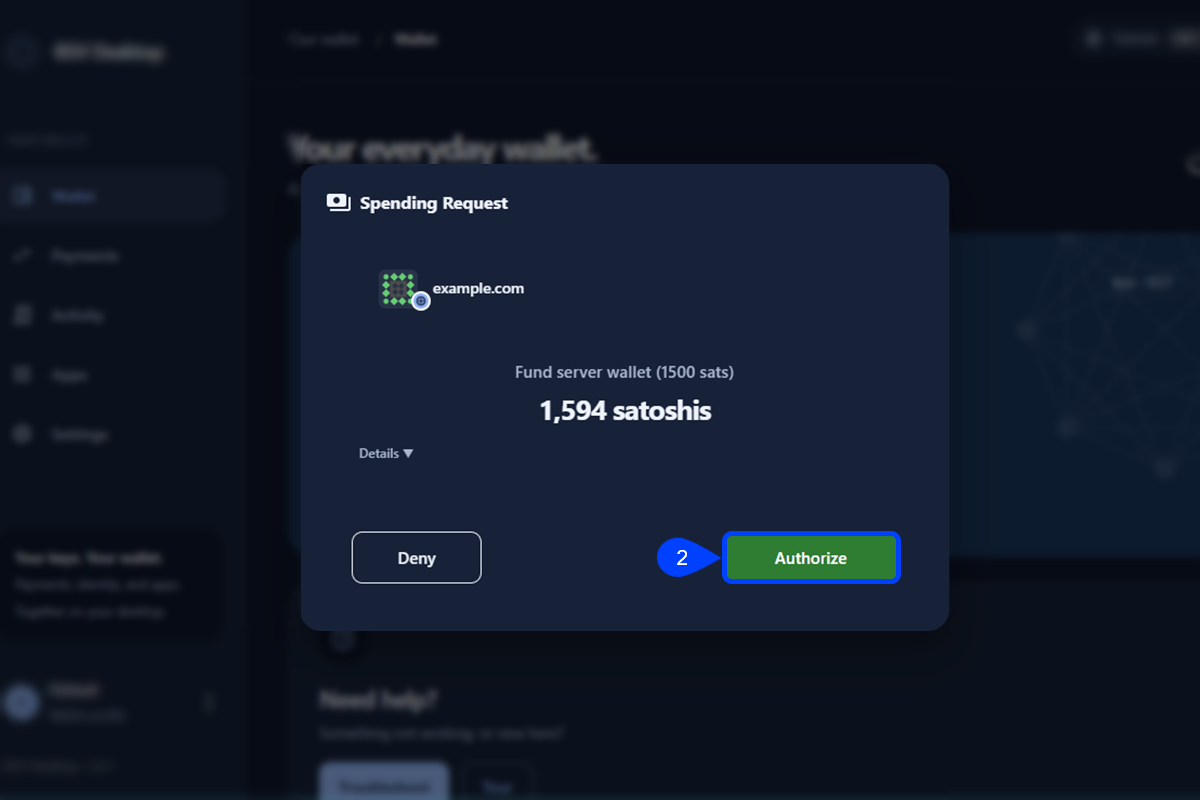
The script ends with the new balance:
Approve the Spending Request in BSV Desktop...
Server wallet balance: 1500 satoshisThe server wallet now holds 1,500 satoshis and spends them with no approval from anyone.
Send a payment from the server
With the server wallet funded, the server can send 1,000 satoshis to your BSV Desktop address:
Copy your testnet address
In BSV Desktop, open Payments, then Receive, select the BSV ADDRESS tab and click Copy address. A testnet address starts with m or n.
Write the payment script
Create pay.mjs and replace YOUR_TESTNET_ADDRESS with the address you copied:
import { Setup } from '@bsv/wallet-toolbox'
import { openWallet } from './server-wallet.mjs'

const address = 'YOUR_TESTNET_ADDRESS'
const amount = 1000

const setup = await openWallet()
const { network } = await setup.wallet.getNetwork({})
if (network !== 'testnet') throw new Error(`The server wallet is on ${network}, not testnet.`)

const { txid } = await setup.wallet.createAction({
  description: 'Pay BSV Desktop',
  outputs: [{ lockingScript: Setup.getLockP2PKH(address).toHex(), satoshis: amount, outputDescription: 'Payment to BSV Desktop' }],
  options: { randomizeOutputs: false, acceptDelayedBroadcast: false }
})
console.log(`Transaction ID: ${txid}`)
console.log(`Explorer: https://test.whatsonchain.com/tx/${txid}`)
await setup.wallet.destroy()Setup.getLockP2PKHbuilds the locking scriptThe part of a transaction output that sets the condition to spend it that pays to the address, a Pay to Public Key Hash (P2PKH) output.createActionchooses the coins, signs with the keys in.envand broadcasts the transaction. Nothing asks for approval, so check the address and the amount before you run it.
Send the payment
Run the script:
node pay.mjsTransaction ID: <64 character transaction ID>
Explorer: https://test.whatsonchain.com/tx/<64 character transaction ID>The explorer link opens the transaction on WhatsOnChain, the testnet explorer, with the payment of 1,000 satoshis to your address. If it shows This page cannot be found, the explorer has not listed the payment yet, so wait a minute and reload. The server wallet keeps the change, 1,500 minus 1,000 and the fee.
Receive the payment in BSV Desktop
In BSV Desktop, open Payments, then Receive, select the BSV ADDRESS tab and click Check for payments once.
BSV Desktop adds the payment to your Available balance, and Recent activity shows Received BSV at address with the 1,000 satoshis.
Next steps
With the server paying on testnet, follow the payment on the explorer, then build on it: